keskiviikko 10. huhtikuuta 2013

All available SOA Suite Tutorials so far

Available Tutorials


Tutorial 1 on this blog
         Tutorial 1. Part 1. Introduction - Hands-on with O...
             Tutorial 1 part 36 - adding file interface                 
  
Performance troubleshooting SOA Suite with common linux commands

Starting oracle DB automatically at server startup & other DB topics

Installing Oracle SOA Suite on Eucalyptus on-premises cloud
         part 9 - DB Creation
         part 13 - SOA Suite Install

Managing Eucalyptus images

Tutorial 1 part 38. Final testing and end of tutorial


Deploy the composite and see how the input file vanishes and log back onto enterprise manager and see that several new instances created. This is because our test fie contains multiple rows. For each row you will see a request being created. You can view the results by clicking on them and check that the service is performing as before.


That’s all – you’ve now completed a complete end-to-end use case with SOA Suite seeing among other things how to:

  •  Create XML schemas and WSDL files 
  •  Create database tables with SQL developer and jDeveloper 
  •  Create data sources with WebLogic Server Console 
  •  Create web services in Java with jDeveloper and Deploy them to WebLogic Apps server.
  • Test Web services via WebLogic Console
  • Use File, Database and Web Services adapters
  • Create business logic with BPEL
  • Adapt data formats with Mediator 
  • Test composite services with Enterprise Manager Console and SOAP UI

Now you are ready to have fun with SOA Suite and start learnig more!


Tutorial 1 part 37 - adding mediator


Adding mediator
We cannot wire the adapter directly to the added BPEL process because of namespace conflict. There is an “embedded ESB” component called mediator that can be used for doing data transformations, routing decisions etc. very easily.
So drag and drop the mediator to the canvas and wire the file interface to it. Next wire the mediator to the BPEL flow.


 The end result should look like this:


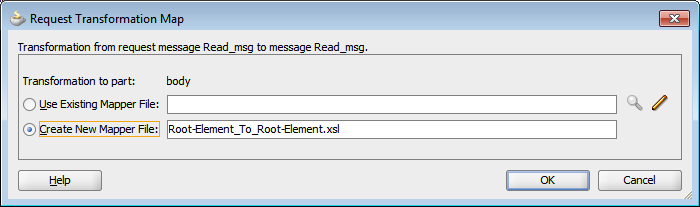
Next open the mediator and click on the icon that looks like cross-connect and its tooltip says: “Select and existing mapper file or create a new one”.


Select create new and press Ok.


You can open both sides to reveal the parameters that need to be mapped to each other. Notice the similarity of names.


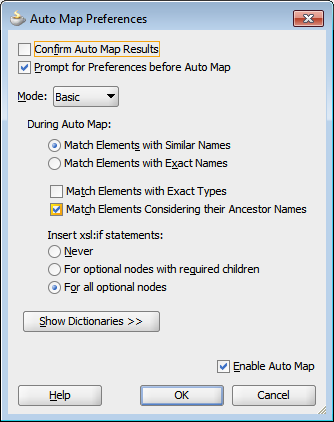
You can drag one-by-one lines between elements but there is also a shortcut. Drag a line from FenceEvent on left to GeoEvent on right and the following dialog opens:


Select ok and you will see an automated mapping between all parameters.
If you see a for-each operation in the mapping, you’ve made a mistake and forgot to click the “File contains multiple messages” checkbox along the path of defining the file adapter.


Save all. Now we have completed our task and can test again.